How does K2[blackpearl] integrate with other systems? One standard way
to do this is through Web Services. And how does K2[blackpearl]
integrate with Web Services? It is done through SmartObjects. So we have: K2 <-> SmartObject <-> Web Service <-> Other System
"A K2 SmartObject can encapsulate data that does not currently reside in an existing system, such as data about an employee's extracurricular activities, his or her family, or hobbies and interests. By using a SmartObject for employee information, all data about an employee is accessed in the same place, and updates are applied to the data at its source. It is important to remember that SmartObjects do not store or cache data. Once created, a SmartObject can be used and reused in a variety of ways; within K2 Designer for Visio, integrated for use in an InfoPath form, a workflow deployed via K2 Studio, in a report, in SharePoint, etc."
SmartObject is all that and also it is the link between K2 and Web Services. So let's see step by step how do we consume a Web Service method.
1. Create Web Service
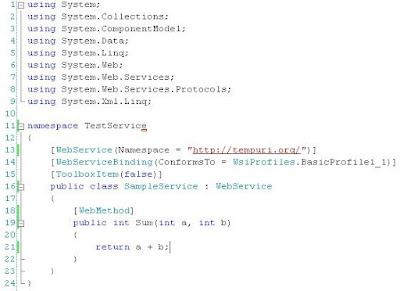
First, let's create a simple web service which we will be consuming later. For the purposes of the demonstration, it will be as simple as returning you the sum of two values.
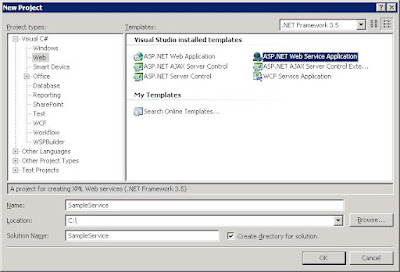
I will use Visual Studio 2008 to create a new 'ASP.NET Web Service Application' project.
Let's create the simple method 'Sum'. See screenshot below:
Of course, you should test it first:
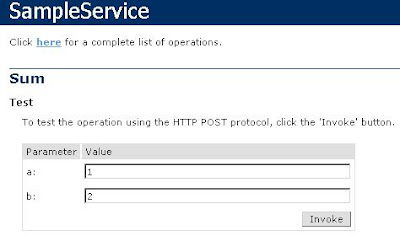
For the curious, it returned 3 ;)
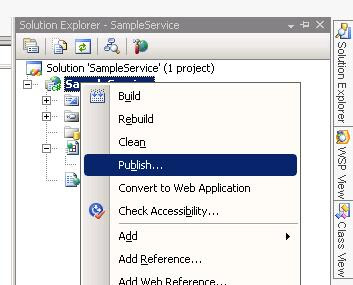
Ok, now we need to publish it somewhere in the network and make sure we can access it! Right click the solution, Publish.
'Publish' it somewhere on your local hard drive and make sure you map it in IIS to a virtual directory. You can do that by going into IIS, choose existing site (or create a new one), right click on it -> New Virtual Directory, browse to the path where you Published the service and keep clicking Next.
Let's assume you published your service to http://localhost:86/SampleService/SampleService.asmx, which in the local network (if you have one) maps to http://192.168.0.1:86/SampleService/SampleService.asmx.
We are done with the service, it's in the network, it works, it is ready to be registered as a service instance.
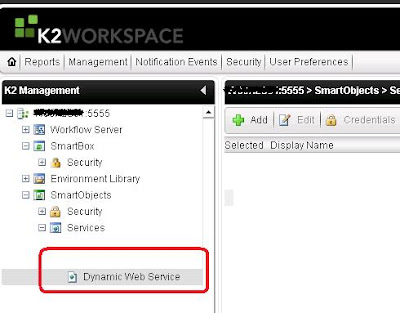
2. From K2 Workspace add it to Dynamic Web Service
Ok, now we have to add it to the 'Dynamic Web Services' list. Open your K2 Workspace. Go to Management -> Management Console -> Expand the servername -> SmartObjects -> Services -> Dynamic Web Service.
Click on the Add button and populate the URL field.
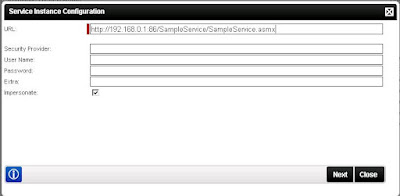
Click Next. In the next screen set names to something that makes sense to you and click Save. Let's call it 'Sample Service'.

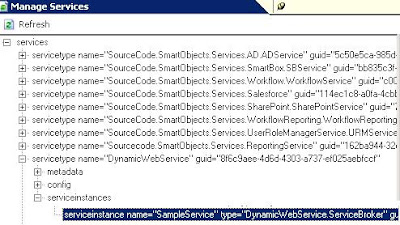
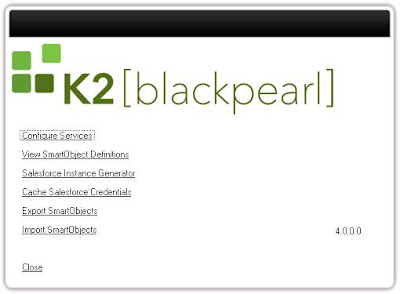
You have now registered a service instance. Let's verify that by going to the K2 server and opening C:\Program Files\K2 blackpearl\ServiceBroker (or C:\Program Files (x86)\K2 blackpearl\ServiceBroker) and run BrokerManagement.exe. On the first screen, click on 'Configure Services'.
Under services -> DynamicWebService -> serviceinstances there should be an instance with a name 'SampleService'.
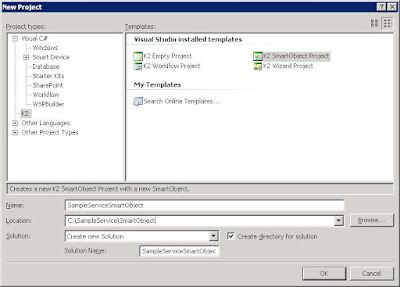
3. Create SmartObject
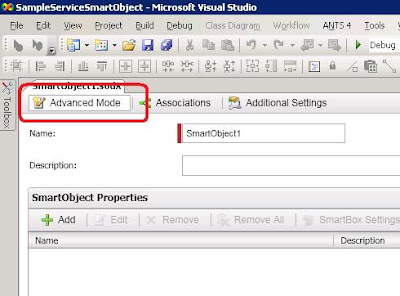
We are good to create a SmartObject around it now. Start a new instance of Visual Studio and create a new K2 SmartObject project.
The first thing you do is switch to Advanced mode.
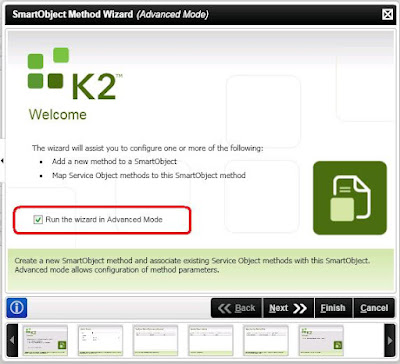
Then Remove All methods that were created for you. We will start from scratch.

Then click on +Add and run the wizard that shows up in Advanced mode (it's a checkbox on the first page).
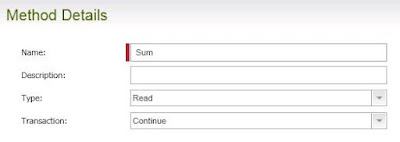
Name the method Sum, make it Read type.
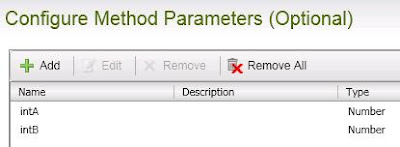
In the next screen, Configure Method Parameters, we will add the two parameters that we have to pass to the method - intA and intB. Make them 'Number's.
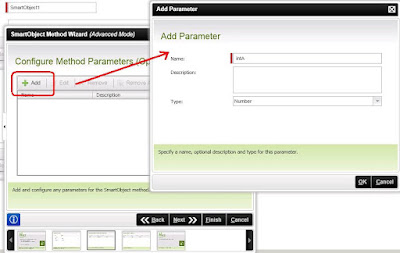
At the end, it should look like this:
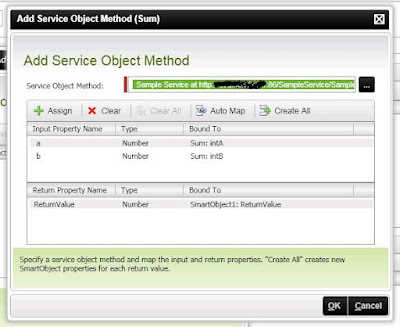
Click Next. On the next screen you have to select the Service Method we will be executing. This is easy. First click Add, to start adding a service method call to the SmartObject. A new popup will show. There is a field 'Service Object Method' and next to it there is a '...' button. Click on the button. It will open the Context browser. Browse through ServiceObjects Server -> Sample Service -> Sum -> Read.
Click Add in the Context Browser. You will see:
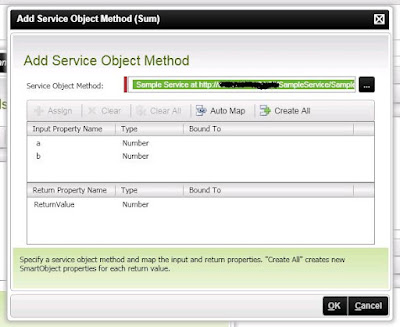
We need to map some fields now. See the 'a' and 'b' input properties? They are the web service method input parameters. We have to 'bind' them to the intA and intB fields we created for the SmartObject.
Click on the first one ('a'), click 'Assign' button and a small pop up will appear. Set 'Map to' to 'SmartObject Method Parameter' and from the second dropdown select 'intA'.
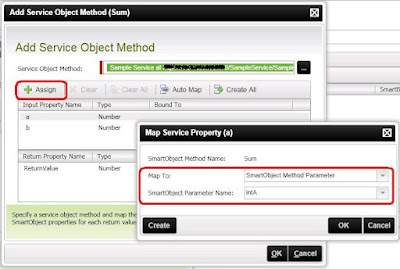
Then click ok and do the same thing for 'b', but select 'intB' instead. For 'ReturnValue' - click on it, Assign, set 'Map To' to SmartObject Property (i.e. you are storing the result in a property of the SmartObject). Then click Create.
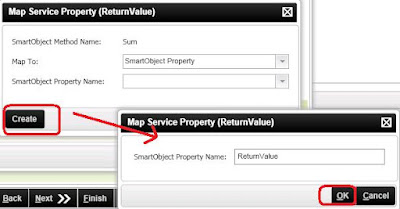
You should end up with:
Click OK and finish the wizard.
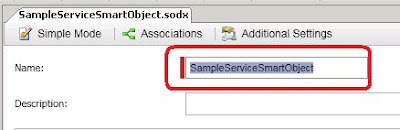
Make sure you name your SmartObject properly.
4. Deploy
Right click the solution and do Rebuild. It should compile with no errors. Let's deploy the SmartObject to our K2 Server. Right click the project -> Deploy. Follow the wizard (Next, Finish) and your SmartObject should be deployed.
5. Test
Let's test your SmartObject. Log into the K2 server and go back to C:\Program Files (x86)\K2 blackpearl\ServiceBroker. Run the file SmartObject Service Tester.exe.
Expand the SmartObjects section, find your SampleServiceSmartObject, expand it until you see the Sum method.
Right click on it, Execute method. Populate the input fields and click 'Sum' button. Promptly, you should see the result displayed.
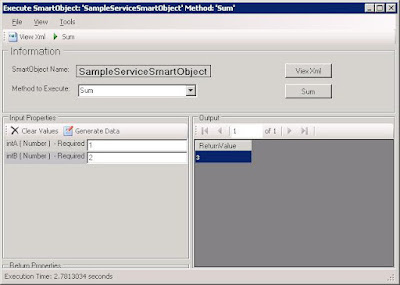
We just invoked the SmartObject, which talked to the WebService, retrieved result for us and was visualized in the test utility. Everything works perfectly, your SmartObject is ready to be consumed from a workflow!
6. Consume in Workflow
Create a new K2 Process Project in Visual Studio. I will reuse the K2 solution we already have and just add the new project to it.
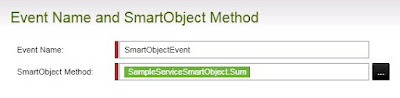
From the Toolbox, drag and drop a new SmartObject event. On the second page, Wizard will prompt you for SmartObject Method. Browse to our Sum method in the SampleServiceSmartObject.
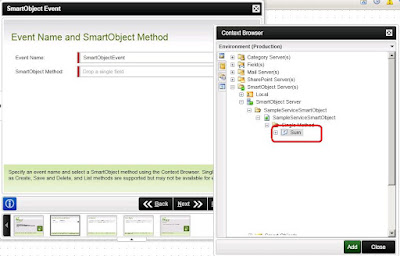
Click Add. It should look like this:
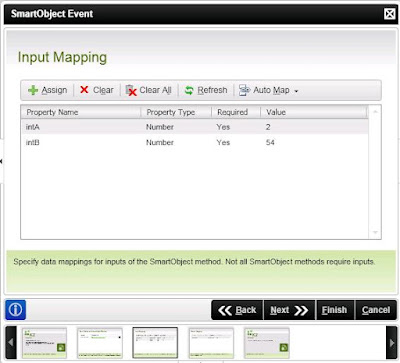
On the next screen, you have to provide values for the SmartObject input properties. This could be K2 DataFields from your process, or actual hardcoded sample values. For the purpose of the demo, we will just bind them to '2' and '54'. Select the property, click Assign button, set value, click ok. It should look like this:
On the next screen, we have to bind the return result to something. Let's bind it to a DataField in the process which we will create. Click on the ReturnValue, click 'Assign', in the popup click on the '...' button which will open the Context Browser. In this browser, either select already existing DataField, or create a new one on the fly (right click -> create). Make sure the field is Integer (for this demo). Select it, click 'Add', then 'Ok' in the pop up.
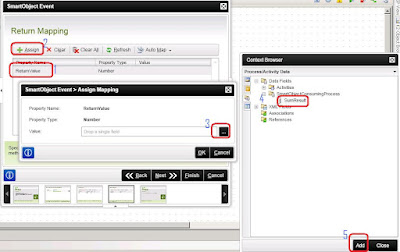
It should look like:
Click finish. You just finished adding a SmartObject event to your workflow. After this event is executed, you will have the value of 'a' + 'b' in the SumValue data field. I.e. you are consuming the SmartObject (and hence the Web Service).

Now you just need to finish the rest of the workflow ;)
7. Change the URL of the service
What if the address of your Web Service changes? Simple, go to the K2 server and open the C:\Program Files (x86)\K2 blackpearl\ServiceBroker folder. Run the BrokerManagement.exe app. On the first screen, click on 'Configure Services'.
Find your service instance again:
Right click on it -> Configure Service. It will open a pop up. There you can change the URL field and click Save.
And that's it, your service instance is now pointing to the right URL.
Basically that's all. Now you know how to consume web services from your K2 Workflows, utilizing SmartObjects!
"A K2 SmartObject can encapsulate data that does not currently reside in an existing system, such as data about an employee's extracurricular activities, his or her family, or hobbies and interests. By using a SmartObject for employee information, all data about an employee is accessed in the same place, and updates are applied to the data at its source. It is important to remember that SmartObjects do not store or cache data. Once created, a SmartObject can be used and reused in a variety of ways; within K2 Designer for Visio, integrated for use in an InfoPath form, a workflow deployed via K2 Studio, in a report, in SharePoint, etc."
SmartObject is all that and also it is the link between K2 and Web Services. So let's see step by step how do we consume a Web Service method.
1. Create Web Service
First, let's create a simple web service which we will be consuming later. For the purposes of the demonstration, it will be as simple as returning you the sum of two values.
I will use Visual Studio 2008 to create a new 'ASP.NET Web Service Application' project.

Let's create the simple method 'Sum'. See screenshot below:

Of course, you should test it first:

For the curious, it returned 3 ;)
Ok, now we need to publish it somewhere in the network and make sure we can access it! Right click the solution, Publish.

'Publish' it somewhere on your local hard drive and make sure you map it in IIS to a virtual directory. You can do that by going into IIS, choose existing site (or create a new one), right click on it -> New Virtual Directory, browse to the path where you Published the service and keep clicking Next.
Let's assume you published your service to http://localhost:86/SampleService/SampleService.asmx, which in the local network (if you have one) maps to http://192.168.0.1:86/SampleService/SampleService.asmx.
We are done with the service, it's in the network, it works, it is ready to be registered as a service instance.
2. From K2 Workspace add it to Dynamic Web Service
Ok, now we have to add it to the 'Dynamic Web Services' list. Open your K2 Workspace. Go to Management -> Management Console -> Expand the servername -> SmartObjects -> Services -> Dynamic Web Service.

Click on the Add button and populate the URL field.

Click Next. In the next screen set names to something that makes sense to you and click Save. Let's call it 'Sample Service'.

You have now registered a service instance. Let's verify that by going to the K2 server and opening C:\Program Files\K2 blackpearl\ServiceBroker (or C:\Program Files (x86)\K2 blackpearl\ServiceBroker) and run BrokerManagement.exe. On the first screen, click on 'Configure Services'.
Under services -> DynamicWebService -> serviceinstances there should be an instance with a name 'SampleService'.

3. Create SmartObject
We are good to create a SmartObject around it now. Start a new instance of Visual Studio and create a new K2 SmartObject project.

The first thing you do is switch to Advanced mode.

Then Remove All methods that were created for you. We will start from scratch.

Then click on +Add and run the wizard that shows up in Advanced mode (it's a checkbox on the first page).

Name the method Sum, make it Read type.

In the next screen, Configure Method Parameters, we will add the two parameters that we have to pass to the method - intA and intB. Make them 'Number's.

At the end, it should look like this:

Click Next. On the next screen you have to select the Service Method we will be executing. This is easy. First click Add, to start adding a service method call to the SmartObject. A new popup will show. There is a field 'Service Object Method' and next to it there is a '...' button. Click on the button. It will open the Context browser. Browse through ServiceObjects Server -> Sample Service -> Sum -> Read.
Click Add in the Context Browser. You will see:

We need to map some fields now. See the 'a' and 'b' input properties? They are the web service method input parameters. We have to 'bind' them to the intA and intB fields we created for the SmartObject.
Click on the first one ('a'), click 'Assign' button and a small pop up will appear. Set 'Map to' to 'SmartObject Method Parameter' and from the second dropdown select 'intA'.

Then click ok and do the same thing for 'b', but select 'intB' instead. For 'ReturnValue' - click on it, Assign, set 'Map To' to SmartObject Property (i.e. you are storing the result in a property of the SmartObject). Then click Create.

You should end up with:

Click OK and finish the wizard.
Make sure you name your SmartObject properly.

4. Deploy
Right click the solution and do Rebuild. It should compile with no errors. Let's deploy the SmartObject to our K2 Server. Right click the project -> Deploy. Follow the wizard (Next, Finish) and your SmartObject should be deployed.
5. Test
Let's test your SmartObject. Log into the K2 server and go back to C:\Program Files (x86)\K2 blackpearl\ServiceBroker. Run the file SmartObject Service Tester.exe.
Expand the SmartObjects section, find your SampleServiceSmartObject, expand it until you see the Sum method.
Right click on it, Execute method. Populate the input fields and click 'Sum' button. Promptly, you should see the result displayed.

We just invoked the SmartObject, which talked to the WebService, retrieved result for us and was visualized in the test utility. Everything works perfectly, your SmartObject is ready to be consumed from a workflow!
6. Consume in Workflow
Create a new K2 Process Project in Visual Studio. I will reuse the K2 solution we already have and just add the new project to it.

From the Toolbox, drag and drop a new SmartObject event. On the second page, Wizard will prompt you for SmartObject Method. Browse to our Sum method in the SampleServiceSmartObject.

Click Add. It should look like this:

On the next screen, you have to provide values for the SmartObject input properties. This could be K2 DataFields from your process, or actual hardcoded sample values. For the purpose of the demo, we will just bind them to '2' and '54'. Select the property, click Assign button, set value, click ok. It should look like this:

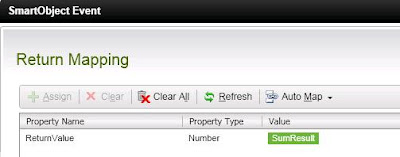
On the next screen, we have to bind the return result to something. Let's bind it to a DataField in the process which we will create. Click on the ReturnValue, click 'Assign', in the popup click on the '...' button which will open the Context Browser. In this browser, either select already existing DataField, or create a new one on the fly (right click -> create). Make sure the field is Integer (for this demo). Select it, click 'Add', then 'Ok' in the pop up.

It should look like:

Click finish. You just finished adding a SmartObject event to your workflow. After this event is executed, you will have the value of 'a' + 'b' in the SumValue data field. I.e. you are consuming the SmartObject (and hence the Web Service).

Now you just need to finish the rest of the workflow ;)
7. Change the URL of the service
What if the address of your Web Service changes? Simple, go to the K2 server and open the C:\Program Files (x86)\K2 blackpearl\ServiceBroker folder. Run the BrokerManagement.exe app. On the first screen, click on 'Configure Services'.

Find your service instance again:
Right click on it -> Configure Service. It will open a pop up. There you can change the URL field and click Save.
And that's it, your service instance is now pointing to the right URL.
Basically that's all. Now you know how to consume web services from your K2 Workflows, utilizing SmartObjects!


0 comments:
Post a Comment