Friday, 4 September 2015

Enabling the ECB menu on a customer column in SharePoint 2013

As part of this blog we are going to see how to achieve the same in SharePoint 2013. The basic concept in SharePoint 2013 still remains the same as SharePoint 2010. However, Since the Design View has been removed from the SharePoint Designer 2013 hence I wanted to put across the modified steps to be performed in the absence of the Design View.
Steps:
As we all know by default the ECB menu is present on the Name column in case of a SharePoint Document Library and on the Title column in case of a SharePoint list. Here we are gong to take the example of a SharePoint Document Library.
Note: The steps remain the same for a SharePoint List as well
  1. Navigate to the Document Library/List where you want to move the ECB menu to a different column. Ensure that the column on which you want to move the ECB menu is present in the view. In our example the column/field is Title
image
2.   Navigate to the Library Tab in the ribbon of the document library and select the Modify view in SharePoint Designer (Advanced) option
image
3.   This will open the view in SharePoint Designer (Use SharePoint Designer 2013)
image
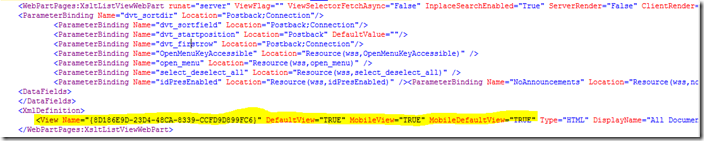
4.   In the Editor locate the <View> element  as shown below
image
5.   Under <View> locate  <ViewFields> and then the <FieldRef Name=”Title”> or the field where you want to enable the ECB menu and then add the attribute ListItemMenu=”TRUE”
image
6.   Save the changes and visit your document library to verify that ECB has been enabled on the Title field.
image     

Hide CallOuts in a SharePoint 2013 Task List

Today I am Posting a quick tip about How to Hide CallOuts in a SharePoint 2013 Task List.
CallOuts by default, are displayed on “Task Name” field in a typical SharePoint 2013 Tasks List.See the screen below.
SharePoint 2013 default Task list

To disable or hide these CallOuts Permanently, you would need to modify the CalloutMenu & CalloutMenuAllowed Properties of this Column or use a Custom Column with CalloutMenuAllowed set to disabled.Read more about this at Here.
For a quick and dirty fix to remove CallOuts from a “Task Name” Field and display the regular ECB (Edit Control Block) menu you can simply Create a Custom View with a different style (other than default). Lets look at the Steps –
1. Navigate to your ListView WebPart or Task List.
2. Select the List Tab and select “Create View”
SharePoint 2013 List Create View
3. Next in the Create New View Page add a name for your view and scroll down to the “Style” section. Select “Newsletter, no lines” in View Style: and save the View.(See below)
SharePoint 2013 View Style
With the new View the List View looks like below –
SharePoint 2013 Task List with ECB

SharePoint 2013 – Where is the Edit Control Block (ECB) menu for Items\Documents

If you are looking for the ECB (Edit control block) for your items\documents in SharePoint 2013 .. well we found it!
In your document library click on the “…” next to your document. This will open up a CallOut Window with a bunch of options beneath it.
Next click on “…” and you will see your Old ECB menu
CallOuts are only displayed for Certain Lists like Tasks,Documents etc. for other lists for example Custom Lists the CallOut does not show up but instead the actual ECB menu or call-up menu is displayed from the “…” link.

Step by steps on how to display Most Visited Sites with number of view count in SharePoint 2013 Web Analytics - See more at: http://www.sharepointpals.com/post/Step-by-steps-on-how-to-display-Most-Visited-Sites-with-number-of-view-count-in-SharePoint-2013-Web-Analytics#sthash.u3rlgLqB.dpuf

It’s a backward step from Microsoft in terms of Web Analytics in SharePoint 2013 by removing the out of the box SharePoint Usage and Search Analytics reports that was provided with a more intuitive GUI in SharePoint 2010. This article shows you how to display most visited sites with view count in easy steps in SharePoint 2013
As you might have known by now that web Analytics is no more a Service Application and it is part of Search Service Application in SharePoint 2013.
Now there are few excel reports named as “Popularity reports” available in each list\library\Site and Site Collection in SharePoint 2013. It shows day/Month wise hit count of each document and list items in SharePoint 2013.But these reports in reality is not more effective and don’t present data needed to identify the effective usage of the SharePoint System. Also the SharePoint 2013 lacks the Web Analytics Web part that was available in SharePoint 2010.
You can now use the Content Search Web Part that is used to generate the Usage and Search Analytics. Content Search Web Part ships along with the Enterprise Edition of SharePoint 2013. When you activate the SharePoint Enterprise Site Features of a site collection you get the Content Search web Part available under the Content Rollup group in the Add Web Part section.
I will take a a examples of a report Most Visited Sites in SharePoint 2013 and explain how you can achieve using the Content Search Web Part which can be generated for a Site Collection, Web Application.
Note: You cannot generate any User Specific reports like “Top Visitors” or “Top Contributors” using the analytics component in SharePoint 2013 as it does not store any user specific data.
I will take a simple example of how to show “Most Visited Sites” in your Site Collection.
Most Visited Sites(With Content Search Web Part):
Make sure you have activated the “Cross Site Collection Publishing” feature activated in Site Collection Features for Content Roll Up section to appear in the Add Web Parts the To add a Content Search Web Part to your page.
Configure the content search web part using the below parameters
Edit the Content Search Web Part and Provide the below values for the properties of the Web part
1. Select “Change Query” Button. In the Basics Tab for Query window, Select the “Switch to Advanced Mode”.
Basics Tab
Value
Query
Local SharePoint Results
QueryText
Use the below query text for Most Visited Sites:

(contentclass:STS_Web AND Path:www.contoso.com/sites/contoso*)


Use the below query for Most Visited Documents

(IsDocument:"True" AND path:http://www.contoso.com/sites/contoso*)

Note: The hit count of documents is recorded in Analytics component when the documents are opened using Office Web Apps in a Web Page.


Use the below query for Most Visited Pages:

(Path:http://www.contoso.com* AND (FileExtension:aspx or FileExtension:html)) (contentclass:STS_ListItem OR IsDocument:True)


Note: The above query only includes Pages content from libraries in the site and excludes any page that are available in the root folder of the site.
Sorting Tab
Value
Sort By
ViewsRecent Descending (Orders the result set by ViewCount for last 14 days )
 
(Or)
 
ViewsLifeTime Descending (Orders the result set by ViewCount from the time the Analytics Component was enabled in the farm)
Click ok to Save the Query.
The above configuration will have the content search web part display the results for the Most Visited Sites, but it does not show you the no. of View Counts.
How do you display the total no. of Views for each Site ?
You can modify the Display Templates for Content Search Web Part to show the View Count. The total no. of Views will be stored in the Managed Properties ViewsRecent or ViewsLifeTime.
You can add managed properties to your item level display template and show the value of the managed property in the display templates which will show you the count in web part.
Note : Download the sample display template with ViewRecent managed property from the bottom of the post
Deploy the Item Template to _catalogs/MasterPages/Display Templates/Content Web Parts folder. A Corresponding JS file will be automatically created in the folder.
The new item level display template can then be used by configuring the web part settings to use it.
You don’t have an Enterprise Edition then how do you generate these reports without Content Search Web Part?
SharePoint 2013 exposes a set of methods via the Microsoft.Office.Server.Analytics Namespace that is used to generate reports programmatically using Server Side Object Model.
There is no programmatic way to query analytics data using Client Side Object Model as it requires RunWithElevatedPrivileges to read data from Analytics Database.
Below I have provided a Code snippet that can be used to generate the Most Visited Sites programmatically. I have used the method GetHitCountForMonth to generate hit count for the last 30 days. You can also query per day by using GetHitCountForDay method.
 Dictionary<string, int> viewCounts = new Dictionary<string, int>();
 SPSecurity.RunWithElevatedPrivileges(delegate
 {
     using (var site = new SPSite("http://www.contoso.com/Sites/Test"))
     {
         using (SPWeb oWebsite = new SPSite("http://www.contoso.com/Sites/Test").OpenWeb())
         {
             SPWebCollection collWebsite = oWebsite.Webs;
 
             foreach (SPWeb subSite in collWebsite)
             {
                 try
                 {
 
                     var context = SPServiceContext.GetContext(site);
                     var searchProxy = context.GetDefaultProxy(typeof(SearchServiceApplicationProxy)) as SearchServiceApplicationProxy;
                     var usageData = searchProxy.GetRollupAnalyticsItemData((int)StandardEventTypeId.View, Guid.Empty, site.ID, subSite.ID);//1 represents "View Count" Event Type
 
 
                     if (usageData.GetHitCountForMonth(DateTime.Now) != null)
                     {
                         viewCounts.Add(subSite.Title, usageData.GetHitCountForMonth(DateTime.Now));
                     }
                     else
                     {
                         viewCounts.Add(subSite.Title, 0);
                     }
                     subSite.Close();
                     return viewCounts;
                 }
                 catch (Exception er)
                 {
                     throw new Exception("An error has occurred. Please contact your farm administrator");
                 }
             }
         }
 
     }
 
 });
You can also use the Microsoft.Office.Server.Search.Analytics.UsageAnalytics Namespace that can be used to generate item level reports such as “Most Visited Documents”. Below I have provided a snippet that can be used to identify view count for each item in a Pages library
 Dictionary<string, int> viewCounts = new Dictionary<string, int>();
 SPSecurity.RunWithElevatedPrivileges(delegate
 {
     using (var site = new SPSite("http://www.contoso.com/sites/test"))
     {
         using (SPWeb oWebsite = new SPSite("http://www.contoso.com/sites/test").OpenWeb())
         {
 
             try
             {
                 var context = SPServiceContext.GetContext(site);
                 var searchProxy = context.GetDefaultProxy(typeof(SearchServiceApplicationProxy)) as SearchServiceApplicationProxy;
                 UsageAnalytics obj = new UsageAnalytics(site);
 
                 SPList list = oWebsite.Lists["Pages"];
                 SPQuery query = new SPQuery();
 
                 foreach (SPListItem item in list.Items)
                 {
                     var usageData = obj.GetAnalyticsItemData((int)StandardEventTypeId.View, item);
                     if (usageData.GetHitCountForMonth(DateTime.Now) != null)
                     {
                         viewCounts.Add(item["Title"].ToString(), usageData.GetHitCountForMonth(DateTime.Now));
                     }
                     else
                     {
                         viewCounts.Add(item["Title"].ToString(), 0);
                     }
                 }
                 return viewCounts;
             }
             catch (Exception er)
             {
                 throw new Exception("An error has occurred. Please contact your farm administrator");
             }
         }
     }
 
 });

Add and configure the Recommended Items and Popular Items Web Part in SharePoint Server 2013

Add a Recommended Items Web Part to a page
Navigate to the page where you want to add the Recommended Items Web Part (RIWP). In our Contoso scenario, we want to add the RIWP to our catalog item page. Do the following:
1.  Select the Settings menu --> Edit page.
2.  In the Web Part Zone where you want to add the Web Part, select Add a Web Part.
3.  In the Categories list, select Search-Driven Content.
4.  In the Parts list, select Recommended Items, and then Add.
In our Contoso scenario, we‘ll show the RIWP below the CSWP.
RIWP added to item page
About the recommendedfor managed property
In a previous blog post, I told you about the UsageAnalyticsId managed property that is used by Usage analytics to specify how recommendations between individual items should be calculated. The result of this calculation is sent to the recommendedfor managed property. The RIWP uses the recommendedformanaged property to query for recommendations. You don’t need to know about this managed property when you configure the RIWP. But, to understand how the query in the RIWP works, it’s important that you keep the recommendedfor managed property in mind.
Configure the Recommended Items Web Part
When you configure the RIWP, you should configure it on an item details page where recommendations have been generated.  Remember, in a previous blog post I told you how I generated recommendations by inviting some co-workers to a “click party.” At this “click party” I told my co-workers to click specific items so that recommendations would be generated. So, in our Contoso scenario, I added the RIWP to an item details page where I knew recommendations had been generated through the clicking of my co-workers.
Here’s what you should do to configure the RIWP:
1.  Select the Settings menu --> Edit page.
2.  In the RIWP, select the Web Part Menu --> Edit Web Part.
Edit Web Part
3.  In the Web Part tool pane, select Change query. This will open a dialog box.
4.  In the Build Your Querydialog box, select the following:
  • In the Get recommended items for section, select A token from the URL and then select from which URL value you want to get recommendations. In our Contoso scenario, we want to get recommendations from {URL.Token.2} (number).
  • In the Restrict by app section, select Specify a URL, and then enter the URL of your catalog.
Configure query for RIWP
So now you might be thinking "OK, that was easy, but what does this actually mean?" Well, understanding what this means is a bit complicated. So, let’s take a deep breath and take a closer look.
  • A token from the URL means that we want to get recommendations for a value that is used in the URL.
  • {URL.Token.2} is a query variable that represents the second value in the URL as counted from right to left. For example, in the URLhttp://www.contoso.com/computers/desktops/5637145799/5637146352, the query variable {URLToken.2} represents the value 5637145799.  Remember, when we connected our publishing site to the catalog, we specified that the value of Group Number should be used as the second to last value in the URL of our catalog item page. That means that the query variable {URL.Token.2}represents the value of Group Number.  Also, we mapped UsageAnalyticsID to Group Number so that the Usage analytics calculation would be based on Group Number. 
  • Specify a URL means that we want to specify from which site we want to get recommendations, in this case our Authoring site.
But from these settings, it’s not clear which managed property is used in the query. So, to view more information about the query, select TEST. The query that is issued by the Web Part is shown in theQuery text section.
Query text in RIWP
If we break this down, we get the following:
  • recommendedfor is the managed property that is used in the query.
  • The colon : means “contains.”
  • 5637145799 is the value of the query variable {URL.Token.2}, which is a Group Number value.
  • path:"http://ib-perf-8/sites/catalog" is the URL to our Authoring site.
  • (IsDocument:"True" OR contentclass:"STS_ListItem") narrows the search result down to only documents or list items.
If we put all this information together, we can understand that the query means the following:

From the URL of the Authoring site, search for document or list items where the value of the managed property recommendedfor contains the value that is currently used as the second value in the URL, counting from right to left.

So, now we know what the query means. But we’re not quite done with the configuration. In the SEARCH RESULT PREVIEW section, we can see that all items in a product group are displayed, for example all SV Keyboard E10 (notice that they all have the same value for Group Number in the URL).
Recommended items in groups
All items in the product group are shown because the Usage analytics calculation is done on the group level (remember, we mapped UsageAnalyticsId to ows_ProductCatalogGroupNumber). But we only want to display one item per product group.
Luckily we can do this by grouping search results. To group search results, do the following:
5.  Select REFINERS --> Show more.
Select Show more on REFINERS tab
6.  From the Group by menu, select Show all properties.
Show all properties for grouping results
7.  We want to show only one item per product group, so we selectProductCatalogGroupNumberOWSTEXT (the managed property of Group Number). We only want to display one item per group, so we leave the value in Show there results as 1.
Group by ProductCatalogGroupNumberOWSTEXT
In the SEARCH RESULT PREVIEW, we can now see that only one item per product group is shown.
One item per group is recommended
8.  Select OK to save the changes.
9.  In the Web Part tool pane, in the Number of items to show field, enter how many items you want to display in the Web Part.
Number of items to show
10.  Select OK, and save the page.
Even though it doesn’t look good, good recommendations are now displayed on our catalog item page.
Recommendations displayed in Web Part
About the display template that is used by the Recommended Items Web Part
Just as you do with the Content Search Web Part (CSWP), you use display templates to control how content should be displayed in a RIWP. In an earlier blog post, I explained how you can upload and apply display templates to the Content Search Web Part. You can do the same for the RIWP, but the display template that is used by the RIWP contains important code that logs the two usage eventsRecommendation Displayed and Recommendation Clicked. 
Remember, in an earlier blog I told you that there are three default usage events in SharePoint Server 2013. The usage events Recommendation Displayed and Recommendation Clicked are used to record statistics of how visitors have interacted with the content on your website. When an item is displayed as a recommendation, a Recommendation Displayed usage event is recorded. When an item is clicked on when it is displayed as a recommendation, a Recommendation Clicked usage event is recorded. I will show you how you can view these statistics in a later blog post. 
In the previous blog we modified the CSWP display template to log the Views usage event. The logging of the Recommendation Displayed and Recommendation Clicked usage events are done in the RIWP. The default display template that is used by the RIWP is Item_RecommendationsClickLogging. This display template contains the two functions LogRecsViewToEventStore and LogRecsClickToEventStore. These two functions log the Recommendation Displayed and Recommendation Clicked usage events.
LogRecsViewToEventStore function
LogRecsClickToEventStore function
When you change your RIWP display template, you should copy the Item_RecommendationsClickLoggingfile, make changes to the copied version, and apply it to your RIWP. That way you don’t have to worry about adding code in the same way that we did for the CSWP.
After applying the changed display template to the RIWP, the recommended items are displayed nicely.
Recommendations displayed with images
Add a Popular Items Web Part to a page
You can display the most popular, that is, the most viewed, items within your catalog by adding a Popular Items Web Part (PIWP) to your category page. It’s important to understand that when you add a PIWP to your catalog page, the PIWP will automatically show the most viewed items within each category. For example, if a visitor is viewing the Cameras category, the PIWP will show the most viewed items within the Cameras category. If a visitor is viewing the Camcorders category, the PIWP will show the most viewed items within the Camcorders category.
To add a PIWP, navigate to the page where you want to add the PIWP. In our Contoso scenario, we’ll add a PIWP to our category page. Do the following:
1.  Select the Settings menu --> Edit page.
2.  In the Web Part Zone where you want to add the Web Part, select Add a Web Part.
3.  In the Categories list, select Search-Driven Content.
4.  In the Parts list, select Popular Items, and then Add.
In our Contoso scenario, we‘ll show the PIWP above the CSWP.
PIWP added to page
Configure the Popular Items Web Part
1.  Select the Settings menu --> Edit page.
2.  In the PIWP, select the Web Part Menu --> Edit Web Part.
Edit Web Part
3.  In the Web Part tool pane, select Change query. This will open a dialog box.
4.  In the Restrict by app section, select Specify a URL and enter the URL of your Authoring site.
5.  In the Restrict by tag section, select Restrict by current and child navigation terms.
No results are displayed in the SEARCH RESULT PREVIEW section. What’s going on?
No popular items returned
To find out more about the query that the PIWP issues, select TEST. On the TEST tab we can see theQuery text.
Query text for PIWP
The query text means the following:
  • path:"http://ib-perf-8/sites/catalog" is the URL to our Authoring site.
  • owstaxIdMetadataAllTagsInfo is the managed property that is used in the query.
  • The colon : means “contains.”
  • #91eb9f0d-3e5a-41a8-8487-78dfe234ca7c is the GUID of the current category. In this example the current category is Cameras.
  • (IsDocument:"True" OR contentclass:"STS_ListItem") narrows the search result down to only documents or list items.
If we put this information together, we can understand that the query means the following:
From the URL of the Authoring site, search for document or list items where the value of the managed property owstaxIdMetadataAllTagsInfo contains the GUID of the current navigation category or any of the children of the current navigation.
An important piece of information that we can see in the query text is that the PIWP uses the owstaxIdMetadataAllTagsInfo managed property in its query. You can’t change the query in the PIWP to use another managed property. That means that for the query in the PIWP to work correctly, the owstaxIdMetadataAllTagsInfo managed property needs to include the value of the managed property that we use to drive managed navigation.  In our Contoso scenario, the managed property that drives managed navigation is owstaxIdProductCatalogItemCategory. So, what we need to do is to map the crawled property of owstaxIdProductCatalogItemCategory to the owstaxIdMetadataAllTagsInfo managed property. 

I showed you how to map a crawled property to a managed property in an earlier blog.

IMPORTANT: You have to do the mapping on the Authoring site.
In our Contoso scenario, the correctly mapped owstaxIdMetadataAllTagsInfo property looks like this:
New crawled property mapping
After you have changed the mapping of the property, you have to start a full crawl.
But there is one very important thing that you can’t see in the query text, and that is how the search results are sorted. The PIWP sorts search results in a descending order on the ViewsRecent managed property. By default, the ViewsRecent managed property contains the number of views for an item within the last 14 days (I’ll show you how you can change this to, for example, the last 7 days in another blog article). This means that the query issued by the PIWP will do the following:
From the URL of the Authoring site, search for document or list items where the value of the managed property owstaxIdMetadataAllTagsInfo contains the GUID of the current navigation category, or any of the children of the current navigation. Sort the search results in descending order of views for the last 14 days.
When the full crawl has finished, you’ll see search result in the Web Part.

Popular items are returned
6.  Select OK to save the changes, and save the page.
Popular items displayed in the Web Part
To display the popular items nicely, you can apply a display template in the same way that you did with the CSWP.
To check that the PIWP is working correctly, go to the Cameras section. On this page, the most viewed items within the Cameras category are displayed.
Popular cameras
When we go to the Camcorders category, the most viewed items within the Camcorders category are displayed.
Popular camcorders
Our PIWP is working the way it should. Nice!
So now you know how to configure the RIWP and the PIWP. You might have noticed that throughout the examples I showed, I was always logged in to my account.
Logged in user
In the next blog post, I’ll explain how all of this works if the website only has anonymous users, that is, users who’re are not logged in.

Wednesday, 2 September 2015

Hierarchy is not being created for my target variation label

You need to run additional timer jobs. For the root variation (in your case english), running the Variations Create Hierarchies Job Definition is sufficient to create the hierarchy. For all additional variation labels you need to start additional timer jobs. In central administration you should see these 4 timer jobs related to variations (per web application): Variations Create Hierarchies Job Definition, Variations Propagate List Items Job Definition, Variations Propagate Page Job Definition and Variations Propagate Site and Lists Timer Job. After creating the second label and clicking the "Create Hierarchies" link you must start additional timer jobs. I can't test it right now, but I am fairly sure you need to start the Variations Propagate Sites and Lists Timer Job. Make sure that the timer jobs actually finish by checking the job's history

What is a SharePoint List?

A list in SharePoint is used to store data across columns in separate rows. You can think of a list as a table in a database that will have columns and rows. You can also think of it as a spreadsheet with columns and rows. Items such as issues, software bugs, employee addresses, phone numbers, web site links or pretty much anything else can be stored.
There are different data types that can be used for each column. The standard types include text, number and date as well as link, user, choice, image and many other types.
The data in the list is displayed through views. A list will always have a default view that displays all items. You may create any number of views and choose which columns to display, what to filter by, how to order by and what to group on.
Security permissions are inherited from the site the list is created in unless you specify unique permissions. Each item's security permissions inherits from it's list's (parent) permission unless you specify unique permissions for it.
Workflows can be created in SharePoint Designer or Visual Studio and added to the list to run when items are added, updated or deleted. This gives you the ability to modify data within the list, add items in other lists or delete associated items anywhere.
A list in SharePoint is used to store data across columns in separate rows. You can think of a list as a table in a database that will have columns and rows. You can also think of it as a spreadsheet with columns and rows. Items such as issues, software bugs, employee addresses, phone numbers, web site links or pretty much anything else can be stored.
There are different data types that can be used for each column. The standard types include text, number and date as well as link, user, choice, image and many other types.
The data in the list is displayed through views. A list will always have a default view that displays all items. You may create any number of views and choose which columns to display, what to filter by, how to order by and what to group on.
Security permissions are inherited from the site the list is created in unless you specify unique permissions. Each item's security permissions inherits from it's list's (parent) permission unless you specify unique permissions for it.
Workflows can be created in SharePoint Designer or Visual Studio and added to the list to run when items are added, updated or deleted. This gives you the ability to modify data within the list, add items in other lists or delete associated items anywhere.

2 Reasons Why You're Not Doing SharePoint on Mobile Devices

If you could steal a glance at a recent Forrester Research report, "SharePoint: Solid In The Enterprise, But Missing The Mobile Shift” you'd instantly conclude that mobile adoption of SharePoint is slow.
The summary of the report even says that.
Joe Herres cofounder of H3 Solutions, an ISV with mobile products for SharePoint and Office 365, sees, more than most of us, reasons for why this might be true.
This is in spite of users in the enterprise and other arenas demanding, or even more likely, assuming they can access SharePoint on mobile.
This is in spite of increasing numbers of vendors with mobile products in the SharePoint system, and an increase in on-premises vendors coming out with mobile apps.

2 Obstacles to Mobile

So what’s stopping people from getting into mobile? Two things, typically, Herres says.
Security. For enterprise customers, Herres says, the main consideration is still security. Not necessarily the fear of data exposure or breach but the question of “How are we going to let them in?”
“On-premises mobile is a pain—you’re dealing with firewalls, web access gateways, all kinds of hoops. The big pain is getting there. If they start with a client such as SharePlus or Colligo, and they’re using web services, are they
going to have to punch a hole in the wall to get there? The biggest perceived challenge is getting inside.” Certainly companies are wanting to jump on the mobile solution bandwagon, and that desire cuts across all verticals.  Often the primary reason companies get interested in mobile, Herres says, is because of a desire to access Exchange; next is wanting to have access to their intranet.
Agility. “Microsoft releases new versions every three years or so, and for SharePoint, they’ve been significantly different each time. People wonder, ‘How am I going to plan and migrate?’ It’s an involved process. By the time they get into the ‘new’ version, it’s time to plan and migrate to the next one. This leaves little room for value-add solutions,” Herres says. “Microsoft has found a formula in SharePoint. Now that they have put SharePoint and Office 365 on the same code base, we’ll see less significant changes.”

1 Imperative for Mobile

Another interesting situation occurs after a mobile solution is requested and purchased. It might be filed under that first-world technology problem known as “fulfilling the requirements versus fulfilling the need that prompted the requirements.”
“People buying for mobility have been the IT shop, whether mandated by their executives or not. When IT is in charge, they check boxes and go on with their day. For example, they’ll buy our product and want everything configured so all of SharePoint comes over to mobile. That’s not good—mobile users are different.” The solution is obvious, but not widely carried out: You need to target workloads to mobile. “You need to ask, what will users need on mobile?” Herres says.
Understandably, loading more than a user needs means the user searches through that much more irrelevant stuff to find the necessities. “They need search, they want discussion features, but they don’t need everything.”
“Search is not available in Microsoft’s mobile features for SharePoint,” Herres points out, noting that H3’s Mobile Entrée builds in search and the ability to created saved searches, and is a mobile platform to deploy to SharePoint, using Visual Studio extensions to integrate it.

Microsoft's Mobile Story

“Microsoft left gaps in its mobile. It chose to focus on social and on documents. Social is the flavor of the year and it makes sense,” Herres says. “Documents make sense. But go back to SharePoint 2003—it’s a collaboration tool, with workloads, task boards, discussions. Microsoft hasn’t focused on the
collaboration side for mobile. It’s the third-party apps that support calendars, task lists, workflows.” “There’s no dev story for mobile for Microsoft. Their story is ‘Here’s an API—go build a Windows Phone app.’ They don’t have a mobile story devoted to SharePoint.”
“SMBs are going to be a really big deal,” Herres notes, for mobile but also for cloud, pointing to Microsoft’s partnership with GoDaddy as a sign. “They’re going to drive business to Office 365. It gives SMBs the ability to act like they’re bigger than they are.”
Look for additional H3 releases in the near future, especially as Microsoft moves to accept auto-hosted apps in its App Store. Auto-hosted apps are “the secret sauce,” Herres says, letting you add to your tenancy an app that’s installed in a Windows Azure container, contained within the Microsoft environment.

SharePoint Development Services in Dubai, Abu Dhabi and Other UAE Cities

Many enterprises have their workplaces in various locations all over the world, and the information sharing among the enterprise people is huge and also increasing fast. There is a need of platform that meets all the requirements for any business to access the information in an efficient way. Microsoft SharePoint is an enterprise platform, allows enterprise users anywhere in the world to manage data in a shared work environment. APH Technologies SharePoint Development Company offers the development, migration and support services in Dubai, London and other UAE Cities through the latest release of SharePoint 2013. If you are interested in SharePoint development Dubai, APH Technologies offers you the custom-made SharePoint Development Services to develop both intranet and internet websites which perfectly fit your enterprise needs.
APH Technologies, one of the top most SharePoint development companies in Dubai, expert in providing SharePoint Integration and SharePoint Migration Services to the companies which are in need of enterprise document management and content management. Our professional SharePoint development team’s experts offer you the SharePoint websites with proper customization, training and technical support to maximize your investment. We provide the free consultation on implementation of Microsoft SharePoint 2010 and the latest SharePoint 2013. APH Technologies SharePoint Development Company Dubai offers you the rich and potential SharePoint websites by carefully planning it as per your enterprise needs.
Microsoft SharePoint Server is a content management web application that makes simpler for enterprises people to store, find, and share the data. Microsoft SharePoint helps people to work together effectively and easy to make business decisions in securing environment. With our Microsoft SharePoint Integration, you can allow your enterprise people to work together across the departments and teams in multiple locations more effectively via intranet and internet.

SharePoint Development Services in Dubai, UAE - APH Technologies

  • Installation, Configuration & Customizations on Microsoft SharePoint 2010, Microsoft SharePoint 2013 and Microsoft Office Online.
  • SharePoint Integration with Microsoft Dynamic CRM
  • Custom integrations using the Client Server object models and Web Services.
  • Business and Enterprise Portal Installations, Configuration and customization services.
  • Customizing existing and Creating new work flows with Microsoft SharePoint 2010 & SharePoint 2013
  • SharePoint Integration with custom dashboards using the SQL Reporting Services, SQL Analysis Services and Performance Point Server.
  • Migrate to Microsoft SharePoint
  • Microsoft SharePoint Enterprise application Maintenance and support. APH Technologies SharePoint Service Providers Dubai offering,
  • Technical support available round the clock.
  • SharePoint integration & migration service operations in Dubai, London, India and other cities in UAE.
  • Dedicated SharePoint Development teams for each customer

SharePoint Support Services Dubai, UAE - APH Technologies

  • Managing user accounts/administration
  • Troubleshooting
  • SharePoint configuration i.e. creation of new websites, content types, meta data, system parameters, work flow, and etc.
  • SharePoint customizations & integrations.

Tuesday, 1 September 2015

10 things you should know: Microsoft's SharePoint Services

SharePoint Services leverages Microsoft's Web-friendly product philosophy alongside its affinity for desktop apps, and does so in a way (as so many Microsoft products do) that just lulls you into going with the flow. Security is piggybacked on infrastructure already in place; the product's ancillary features are simply more convenient and (despite shortcomings) in many cases more economical to just use, since they're there anyway, than more capable alternatives.
We're inclined not to quibble. SharePoint Services gives you a lot of things you may have found yourself wishing for, things you couldn't have because you'd have to go to the trouble of rolling your own or fiddling with your infrastructure in order to achieve them. And some of them might not be immediately apparent: SharePoint Services is touted as a document management system, and there's a built-in problem with that concept, because we all have a pretty fixed and mundane idea of what a document management system is. SharePoint's Web-centric orientation, however, gives it some unexpected punch, and may change your thinking. Here are some points to consider.

1. SharePoint extends Exchange Server


If you're using Exchange Server to handle your email traffic, SharePoint can greatly simplify distribution. You can create a SharePoint site as a singular point for receiving Exchange traffic and, at a stroke, have de facto distribution of that traffic to a particular group or groups, with all the security and membership built-in. By setting up a public folder for SharePoint in Exchange, Exchange's work is done—SharePoint pulls from the folder and does the work.

2. SharePoint collaboration solutions are scalable


It's well-publicized by Microsoft that SharePoint Services is essentially a collaborative solution toolkit. Creating sites for team interaction, sharing and management of project-specific documents and files, testing, and other collaborative functions are a natural application of SharePoint.
A less hyped aspect of SharePoint is that this collaborative utility is highly scalable. What begins as a resource library shared by a team can be readily telescoped out to accommodate the entire organization or an even broader customer community—SharePoint Services can be readily deployed across multiple servers in a server farm, enabling the creation of massive data stores.

3. SharePoint sites are highly customizable


SharePoint Services comes fully integrated with FrontPage 2003, so all of FrontPage's WYSIWYG Web editing tools are available for use in crafting SharePoint sites. (If your organization swims in the deep end, development-wise, all of this comes with ASP.NET as well.)
Via FrontPage, you can leverage the utility of Web Parts, modular chunks of code you can re-use in SharePoint sites, to grab live data from a broad range of possible sources (Also see #8). You can allow users to control these modules of code by inserting Web Part zones in your sites, enabling sophisticated drag-and-drop controls. You have complete control over style through XSLT, which you can manipulate either directly or through FrontPage—and you can employ conditional formatting if it desired.

4. SharePoint extends InfoPath


InfoPath 2003 is Microsoft's desktop application technology for integrated forms management and data transport. InfoPath is a powerful and underrated technology in itself, and both its XML backbone and forms-friendliness mesh well with SharePoint.
Specifically, you'll find it useful to publish InfoPath forms directly to a SharePoint library. In such a library, forms can be stored and (more importantly) shared, and accessible to working teams leveraging SharePoint as a collaborative tool. (The base form is stored in the library header; populated XML result sets make up the library itself.)
And with SharePoint Portal, you can leverage SharePoint Portal Web services to enhance the utility of InfoPath forms for your desktop community, by accessing information in other systems within your organization (or from outside, for that matter) and populating forms with it as needed.

5. Metadata can be used to create dynamically parsed storage systems


Metadata is critical to the SharePoint Server concept, and comes in several flavors. With metadata you can effectively create customized search arguments that permit you to organize information dynamically, and to use search criteria from one document library to retrieve information from another.
Put another way, you can forego the traditional hierarchical folders in organizing your document libraries, if it's appropriate. Instead, you can create metadata lookups that can not only be used as organizational keys for documents in one library, but can be used as search arguments to locate documents in other libraries. In this way, you can create searchable document pools with effectively dynamic organization, not only searchable but re-organizable without any physical manipulation of the documents themselves.

6. SharePoint can be a data transport mechanism


SharePoint's primary features include the ability to set up shared distribution points for data from a wide range of sources, moved by different modes of transport (see #1, #4). But its data transport role doesn't end there. Depending on what your organization's sites contain, content-wise, and the role(s) the sites are playing in your system, you can actually distribute data from server to server by means of SharePoint's site-moving utilities (see #10).
For instance, if you have SharePoint sites deployed internally to represent data in different workflow stages, the SharePoint content databases of those sites can be rotated in a de facto batch process using these utilities (which are Command Line programs and therefore scriptable).

7. Use the Task Pane to turn Word libraries into collaborative systems with built-in administration


SharePoint Services is primarily about document management. Saving Word documents to SharePoint, placing documents in libraries, and checking them in and out are SharePoint's most obvious functions.
But the extension of those functions into shared workspaces is where those features become really empowering, rather than simply utilitarian. You have a Task Pane that ties documents to libraries, and within it lie a number of important features that take you from the simple management of documents to real collaboration and administration. Through the Task Pane, you can:
  • track status and versioning of documents
  • define and track who has site/document access
  • do task monitoring
  • create alerts
You can, of course, save from all Office applications—not just Word—to SharePoint.

8. SharePoint can pull data from external databases and other data sources


Web Parts and Web Part architecture (available to your SharePoint development by way of FrontPage 2003 or ASP.NET) can become a powerful component of your SharePoint sites. In particular, Data View Web Parts allow you to add views to your sites from a variety of data sources. You can create views specific to your SharePoint sites and link views together. Data sources can be databases, Web services, or any XML source (InfoPath documents, etc.).

9. Leverage Excel for data management


Exporting data to Excel is well-supported in SharePoint and makes graphing and printing convenient (via the Print with Excel and Chart with Excel options). But it's also possible (and may often be desirable) to export data to Excel just for the sake of manageability. The Excel Export function creates an Excel Web query linking to the original data. In this way, you can create spreadsheets that will accept data, and then push that data to SharePoint.
This can be done by generating an Excel spreadsheet, then linking the spreadsheet to SharePoint (by using Export and Link to Excel from a Datasheet Task Pane). Once this is done, data can be entered into the spreadsheet and pushed from the spreadsheet to Excel with the Synchronize List option.

10. Sites and entire site collections can be backed up in a single operation


The ability to move a site, lock-stock-and-barrel (and even more so a site collection, which includes primary site, sub-sites and all their contents), should not be under-appreciated. Anyone who's migrated sites the hard way knows it can be maddeningly frustrating. SharePoint Services includes two utilities that will greatly reduce the frustration: STSADM and SMIGRATE.
SMIGRATE began life as an upgrade utility, shepherding data from old SharePoint to new. Now it's for backup/restore and for moving sites wholesale. It's a command line utility, so it's tailor-made for scripting, and can simplify the process of moving a site and its contents to the point that it can conceivably be a content distribution tool in some scenarios.
Its weakness is that when a site is moved with the SMIGRATE utility, its security settings don't all move with it. Remember to check your settings after a move or restore.
And while SMIGRATE will not preserve your security settings, STSADM will. This utility will move not only a site but a site collection, and does far more: you can use it to create sites, delete site collections, import templates, and move data