Saturday, 18 July 2015

Info Path for Document Library SharePoint 2013


  1.   Open Info Path designer 2013
  2.   Double click on Document Information Panel or select Document Information Panel and click on Design Form right below.
 
3.     Enter URL of your document library and click Next button.
4.       Select Content type and click Next button.
5.       Now finish the wizard.
A default form will be created and then save your form and then publish the Info Path form as below.
Done!

Remove a content type from a list or library


When you remove a content type from a list or library, users will no longer be able to create new items of that content type inside the list or library. Removing a content type from a list or library does not delete any items that were created from the content type.
  1. Go to the list or library from which you want to remove the content type.
  2. Do one of the following:
    • If you are working in a list, click the List tab, and then click List Settings.
    • If you are working in a library, click the Library tab, and then click Library Settings.
Under Content Types, click the name of the content type that you want to remove.
Note   If the list or library has not been set up to allow multiple content types, the Content Types section does not appear on the Customize page for the list or library.
  1. Under Settings, click Delete this content type.
When you are asked whether you are sure that you want to delete this content type, click OK.

How content types work in lists and libraries


When you add a content type to a list or library, you make it possible for that list or library to contain items of that type. In addition, users can just click the New Document command to create an item of that type. A single list or library can contain multiple content types, and each content type can have unique metadata, policies, or behavior.

How inheritance works for list content types

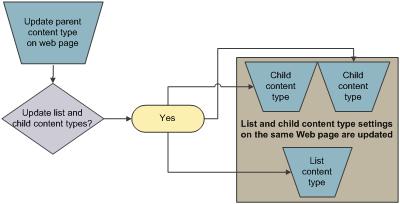
When you add a site content type to a list or library, it is called a list content type. The list content type is a child of the site content type from which it was created. It inherits all the attributes of its parent site content type, such as its document template, read-only setting, workflows, and columns. If the parent site content type for a list content type is updated, the child list content type can inherit these changes. A list content type can be customized for the specific list or library to which it is added. These customizations do not apply to the parent site content type.
Content type parent/child relationship
If the child content type shares attributes with the parent site content type, those attributes might be overwritten when the list content type inherits changes from the parent. If the list content type has custom attributes that the parent content type does not have, these customizations are not overwritten.
Top of Page

Change the New Document button order or default content type

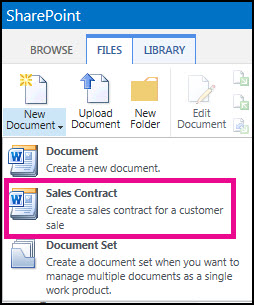
You can specify the order in which content types are displayed on the New Document button for a list or library. By default, the first content type that is displayed on the New Document button becomes the default content type for the list or library. To change the default content type for the list or library, change the content type that is displayed first on the New Document button. You can also specify whether you want content types that were added to a list or library to be visible on the New Document button.
Drop down from New Document menu showing a Sales Contract content type.
To change the order of items on the New Document menu, follow these steps.
  1. If the list or library for which you want to change a content type is not already open, click its name under Lists or Documents on the Quick Launch.
  2. On the ribbon, do one of the following:
  3. If you are working in a list, click List Settings.
  4. If you are working in a document library, click Library Settings.
  5. Under Content Types, click Change new button order and default content type.
    Note    If the list or library is not set up to allow multiple content types, the Content Types section does not appear on the Customize page for the list or library.
  6. In the Content Type Order section, do either of the following:
  7. To remove a content type from the New Document button for the list or library, clear the Visible check box.
  8. To change the order in which a content type appears on the New button, click the arrow next to that content type in the Position from Top column. Then, select the order number that you want.

Add a content type to a list or library

When you add a content type to a list or library, site users can just use the New Document command to create specialized content quickly.
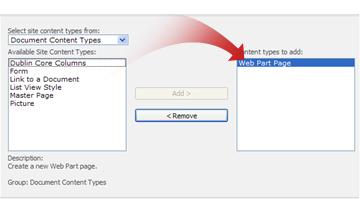
Choosing a content type
Important    To add content types to a list or library, you must have at least the Design permission level for that list or library.
To add a content type to a list or library, follow these steps:
  1. If the list or library is not already open, click its name on the Quick Launch. If the name of your list or library does not appear, click View All Site Content, and then click the name of your list or library.
  2. For lists, click the List tab on the Ribbon. For libraries, click the Library tab.
  3. For lists, click List Settings on the Ribbon. For libraries, click Library Settings.
  4. Under Content Types, click Add from existing site content types.
    Note    If the list or library is not set up to allow multiple content types, the Content Types section does not appear on the Settings page for the list or library. To learn how to allow multiple content types, see Turn on support for multiple content types in a list or library.
  5. In the Select Content Types section, in the Select Site content types from list, click the arrow to choose the group of site content types from which you want to select.
  6. In the Available Site Content Types list, click the name of the content type that you want, and then click Add to move the selected content type to the Content types to add list.
  7. To add more content types, repeat steps 5 and 6.
  8. When you finish selecting all of the content types that you want to add, click OK.

Friday, 17 July 2015

Info Path


What is Info Path?
Microsoft InfoPath is a software application for designing, distributing, filling and submitting electronic forms containing structured data. Microsoft initially released InfoPath as part of Microsoft Office 2003 family.
InfoPath forms advantages & disadvantages
Info path advantages

InfoPath is a better XML standard, but the true benefits depend on the situation. I'll try to list some pros for InfoPath + SharePoint:
1) You can connect to many back-end data sources to get data, whether it be SharePoint itself, SQL DBs, Access, or any web service that interfaces with a non-MS DB.
2) The forms can be directly integrated with SharePoint through form libraries, which allows your people to stay within the primary collaboration interface (SharePoint) when doing all your work, including filling out electronic forms.
3) When the form is submitted to the form library, the data is then discoverable in the search index across all of SharePoint (depending on how your enterprise search is configured)
4) If using MOSS 2007 Enterprise, then you have the option of browser-enabled forms where people can interact with the forms from different non-MS platforms and non-MS browsers without the users needing the InfoPath client.
5) Submitting forms to SharePoint allows you to then trigger workflows that can do just about anything you want for routing, notification, updating data in other lists/libraries, etc.
6) InfoPath is part of the Office Suite and has already been improved greatly in 2010. It is built to interface and integrate with other Office products, including Word and Outlook.

InfoPath offers the following advantages as a form technology for
Agile Point-based, process-driven applications:
  • Created using a GUI. No code is required.
  • Easy to use and business user friendly.
  • Rapid form creation.
  • Close integration with SharePoint.
  • Dynamic lookups from most any external data source, including SharePoint.
  • Simple integration with SharePoint, web services, and databases.
  • Multiple views for single form.
  • Repeating tables.
  • Dynamic validation.
  • Conditional formatting.
  • Multiple attachments.
  • Multi-lingual form capabilities.
  • Custom branding.
  • Web-based or client-based data entry mode.


Info Path Disadvantages

InfoPath includes the following disadvantages as a form technology for AgilePoint-based, process-driven applications:
  • Difficult to integrate with process-driven applications outside of SharePoint
  • Difficult to secure sensitive data.
  • Both web-based and client-based forms require the InfoPath client license.
  • InfoPath Forms Server license is required for web-based forms.
  • Limited standard controls.
  • No support for custom controls.
  • No support for AJAX.
  • No multilingual support.
  • Performance reduction on large or complex forms. Post back to form is slow, and performance is not good.
  • Custom, managed code is difficult to maintain.

Sunday, 12 July 2015

SharePoint 2013 Variations - Initial setup and configuration for variations site

 Following posts will guide through developing multilingual site using SharePoint 2013:

Part 1: Initial setup and configuration for variations site
Part 2: Creation and synchronization of content between source and target sites
Part 3: Managed Navigation on variation site
Part 4: Content Translation...coming soon!
This post will show how to setup variations on a SharePoint 2013 publishing site. Variations can be used only on sites that are created by using one of the Publishing site templates, or on sites with SharePoint Server Publishing Infrastructure feature activated. The first step is to create a Site Collection using Publishing Site template. 

Variation Settings


Navigate to Site Setting-->Variation Settings


On Variation setting page, Site, List and Page Creation behavior setting provides control over content synchronization from source to target labels. Create Everywhere is selected by default, this means any content created in source label will propagate to all target variations. There are few other self explanatory settings like Recreate Deleted Target Page, Update Target Page Web Part and Notification, which can be changed if needed, otherwise leave all settings to default and click OK.

Variation Labels


Next step is to create Variation Labels. SharePoint 2013 will assign first created label as Source label. 

When creating Variation Label, Language setting determines the language of the user interface on the variation site.
The locale setting assists with browser redirection and regional settings such as Sort order and Calendar. It does not affect the language of the user interface.
Not to be confused between Language and Locale settings, even if language packs are not installed,  Variation Labels for different locale can still be created and content can be translated into different languages. Language packs will only affect SharePoint user interface for content authors and admins.

In the example scenario under Locale I have selected English(United States) for my source label. Variation Home is the location site where sub sites for all labels will be created. Under Publishing Site Template there are two options, Publishing Site and Publishing Site with workflow. I have selected Publishing Site. However in most real time scenarios this will be Publishing Site with workflow, so that content authors can get approval using workflow before publishing the content.

Now that source label is created, next step is to create first target label. This time SharePoint will present a wizard like interface which is new to SharePoint 2013 and much easier to navigate!

Step 1. Configure your target label: On this tab Site Template Language will show the list of installed language pack to select.  However this is only required for Site Settings UI. Select locale for target variation.
P.S: Language packs are not required for creating target labels in different locales.


Step 2. Name your Target Label: This will show a default label name for variation label, that can be changed from this interface. Under Hierarchy Creation, default selected option is "Publishing Sites, Lists with Variations and All Pages", this option will build the label structure and sync all the content from Source Label.


Step 3. Translation Options: On this tab there are options to enable Human and Machine Translation. In this case I have  selected "Allow Human and Machine translation" and selected target languages. SharePoint 2013 provides industry standard support for manual and automated translation! I will explain content translation in my next post.


Step 4. Target Label Behavior: Page update behavior is useful when target variation owners do not want to get content updates automatically pushed from source label to target label. A scenario would be, after source label has pushed content for the first time and target content authors have translated/localized the content, then later if source label has changed, the target content authors may not want the content to sync automatically. Content synchronization is covered in detail in my post Creation and synchronization of content between source and target labels


Step 5. Review Label Settings: There are few settings which can not be changed once label is created, so make sure to review the settings and click OK. This will create the label but Hierarchy is still not created.

Creating Hierarchy: Creating Hierarchy is required first time when a new label is created. It is not required to create all labels to start with, labels can also be created in later stages. Sometimes hierarchy creation can take longer based on schedule on Timer jobs and also the amount of content and site structure on source variation.
Once labels are created next step is to click on Create Hierarchy on "Variation Labels screen" and wait for Variations Create Hierarchy Timer Job to run. This will copy the content from source label to target labels for the first time.

I have discussed Variation Timer Job details in my post Creation and synchronization of content between source and target labels

During the hierarchy creation several timer jobs run. All the logs related to this process are located under Variation logs. They provide great deal of details and are very useful in troubleshooting Hierarchy creation or Page propagation issues. 

Variation logs are located under root site settings.


Once Hierarchy is created, "Hierarchy is Created" status on Variation Label page will change to Yes. This means labels are created successfully and ready to browse!

Friday, 15 May 2015

Jscript Full Calendar

This JScript Full Calendar  hepls you to add, delete events on client side. Just follow the following simple steps-

Click here to download required css and js file.

Copy and paste the following code-

<script type="text/javascript">

        /*
        jQuery document ready
        */

        $(document).ready(function () {
            /*
            date store today date.
            d store today date.
            m store current month.
            y store current year.
            */
            var date = new Date();
            var d = date.getDate();
            var m = date.getMonth();
            var y = date.getFullYear();

            /*
            Initialize fullCalendar and store into variable.
            Why in variable?
            Because doing so we can use it inside other function.
            In order to modify its option later.
            */

            var calendar = $('#calendar').fullCalendar(
            {
                /*
                header option will define our calendar header.
                left define what will be at left position in calendar
                center define what will be at center position in calendar
                right define what will be at right position in calendar
                */
                header:
                {
                    left: 'prev,next today',
                    center: 'title',
                    right: 'month,agendaWeek,agendaDay'
                },
                /*
                defaultView option used to define which view to show by default,
                for example we have used agendaWeek.
                */
                defaultView: 'agendaWeek',
                /*
                selectable:true will enable user to select datetime slot
                selectHelper will add helpers for selectable.
                */
                selectable: true,
                selectHelper: true,
                /*
                when user select timeslot this option code will execute.
                It has three arguments. Start,end and allDay.
                Start means starting time of event.
                End means ending time of event.
                allDay means if events is for entire day or not.
                */
                select: function (start, end, allDay) {
                    /*
                    after selection user will be promted for enter title for event.
                    */
                    var title = prompt('Event Title:');
                    /*
                    if title is enterd calendar will add title and event into fullCalendar.
                    */
                    if (title) {
                        calendar.fullCalendar('renderEvent',
                            {
                                title: title,
                                start: start,
                                end: end,
                                allDay: allDay
                            },
                            true // make the event "stick"
                        );
                    }
                    calendar.fullCalendar('unselect');
                },
                /*
                editable: true allow user to edit events.
                */
                editable: true,
                /*
                events is the main option for calendar.
                for demo we have added predefined events in json object.
                */
                events: [
                    {
                        title: 'All Day Event',
                        start: new Date(y, m, 1)
                    },
                    {
                        title: 'Long Event',
                        start: new Date(y, m, d - 5),
                        end: new Date(y, m, d - 2)
                    },
                    {
                        id: 999,
                        title: 'Repeating Event',
                        start: new Date(y, m, d - 3, 16, 0),
                        allDay: false
                    },
                    {
                        id: 999,` 
                        title: 'Repeating Event',
                        start: new Date(y, m, d + 4, 16, 0),
                        allDay: false
                    },
                    {
                        title: 'Meeting',
                        start: new Date(y, m, d, 10, 30),
                        allDay: false
                    },
                    {
                        title: 'Lunch',
                        start: new Date(y, m, d, 12, 0),
                        end: new Date(y, m, d, 14, 0),
                        allDay: false
                    },
                    {
                        title: 'Birthday Party',
                        start: new Date(y, m, d + 1, 19, 0),
                        end: new Date(y, m, d + 1, 22, 30),
                        allDay: false
                    },
                    {
                        title: 'Click for Google',
                        start: new Date(y, m, 28),
                        end: new Date(y, m, 29),
                        url: 'http://google.com/'
                    }
                ]
            });

        });

    </script>

    <style type="text/css">
        body
        {
            margin-top: 40px;
            text-align: center;
            font-size: 14px;
            font-family: "Lucida Grande",Helvetica,Arial,Verdana,sans-serif;
        }
        #calendar
        {
            width: 900px;
            margin: 0 auto;
        }
    </style>

        <div id='calendar'></div>


Any Query, please comment.